[TOC]
Convolutional Neural Networks: Step by Step
Implement convolutional (CONV) and pooling (POOL) layers in numpy.
Notation:
- Superscript $[l]$ denotes an object of the $l^{th}$ layer.
- Example: $a^{[4]}$ is the $4^{th}$ layer activation. $W^{[5]}$ and $b^{[5]}$ are the $5^{th}$ layer parameters.
- Superscript $(i)$ denotes an object from the $i^{th}$ example.
- Example: $x^{(i)}$ is the $i^{th}$ training example input.
- Lowerscript $i$ denotes the $i^{th}$ entry of a vector.
- Example: $a^{[l]}_i$ denotes the $i^{th}$ entry of the activations in layer $l$, assuming this is a fully connected (FC) layer.
- $n_H$, $n_W$ and $n_C$ denote respectively the height, width and number of channels of a given layer. If you want to reference a specific layer $l$, you can also write $n_H^{[l]}$, $n_W^{[l]}$, $n_C^{[l]}$.
- $n_{H_{prev}}$, $n_{W_{prev}}$ and $n_{C_{prev}}$ denote respectively the height, width and number of channels of the previous layer. If referencing a specific layer $l$, this could also be denoted $n_H^{[l-1]}$, $n_W^{[l-1]}$, $n_C^{[l-1]}$.
We assume that you are already familiar with numpy and/or have completed the previous courses of the specialization. Let’s get started!
卷积神经网络
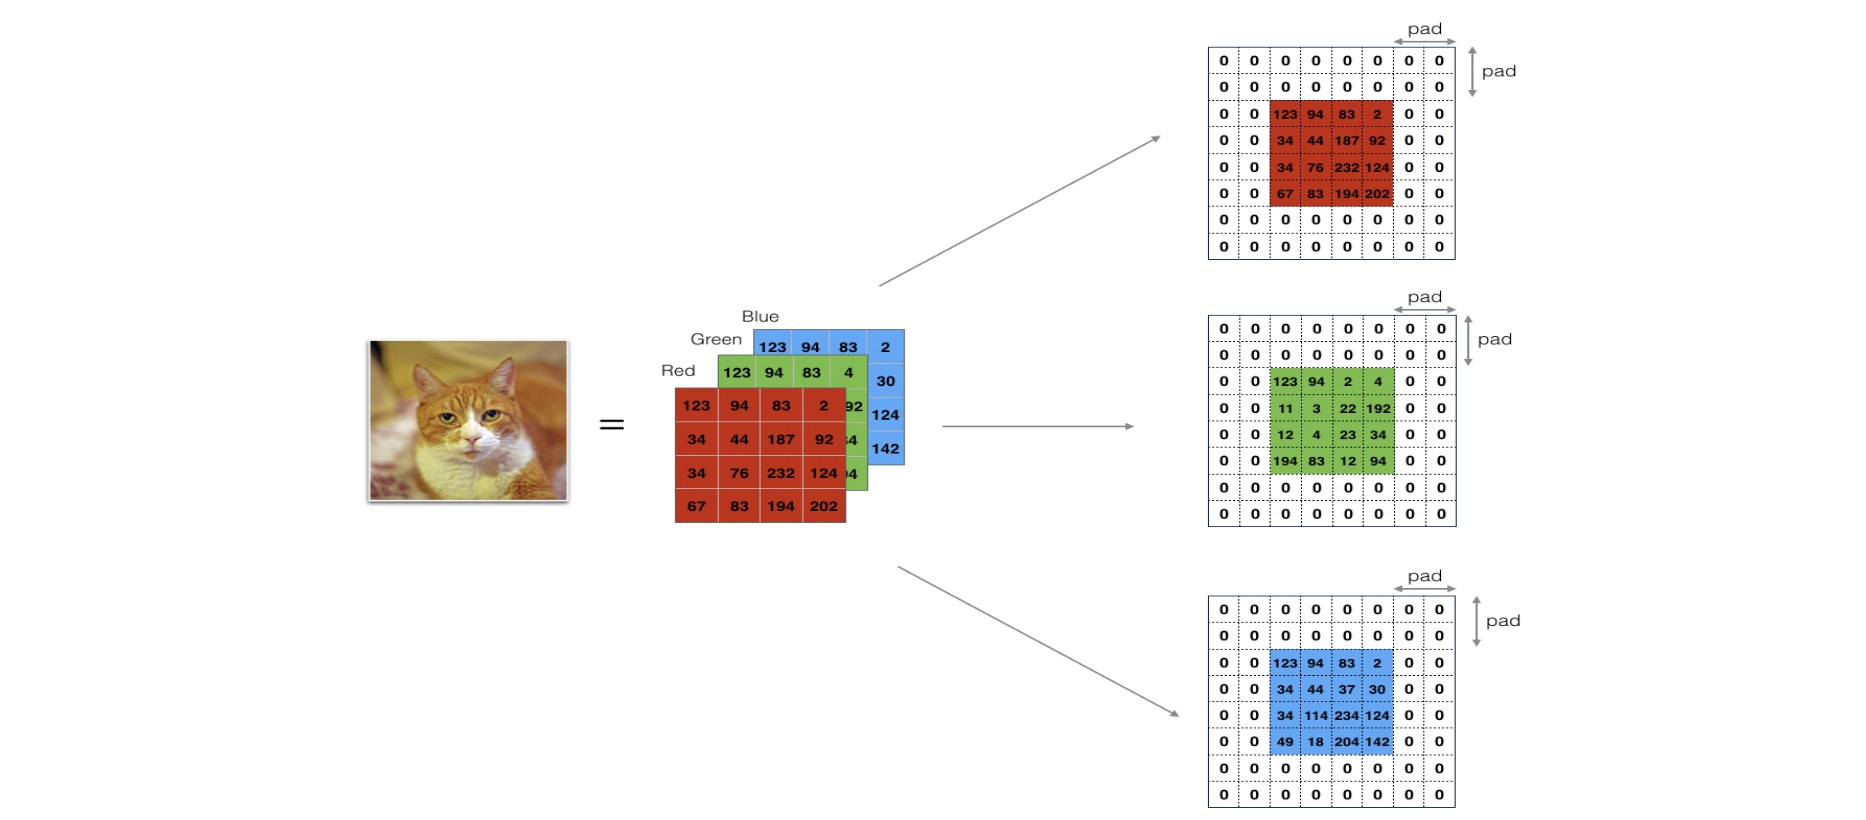
Zero-Padding

- 卷积了上一层之后的CONV层,没有缩小高度和宽度。 这对于建立更深的网络非常重要,否则在更深层时,高度/宽度会缩小。 一个重要的例子是“same”卷积,其中高度/宽度在卷积完一层之后会被完全保留。
- 它可以帮助我们在图像边界保留更多信息。在没有填充的情况下,卷积过程中图像边缘的极少数值会受到过滤器的影响从而导致信息丢失。
def zero_pad(X,pad):
    """
    把数据集X的图像边界全部使用0来扩充pad个宽度和高度。
参数:
    X - 图像数据集,维度为(样本数,图像高度,图像宽度,图像通道数)
    pad - 整数,每个图像在垂直和水平维度上的填充量
返回:
    X_paded - 扩充后的图像数据集,维度为(样本数,图像高度 + 2*pad,图像宽度 + 2*pad,图像通道数)

"""

X_paded = np.pad(X,(
                    (0,0),       #样本数,不填充
                    (pad,pad),   #图像高度,你可以视为上面填充x个,下面填充y个(x,y)
                    (pad,pad),   #图像宽度,你可以视为左边填充x个,右边填充y个(x,y)
                    (0,0)),      #通道数,不填充
                    'constant', constant_values=0)      #连续一样的值填充

return X_paded

# 测试
np.random.seed(1)
x = np.random.randn(4,3,3,2)
x_paded = zero_pad(x,2)
#查看信息
print ("x.shape =", x.shape)
print ("x_paded.shape =", x_paded.shape)
print ("x[1, 1] =", x[1, 1])
print ("x_paded[1, 1] =", x_paded[1, 1])

#绘制图
fig , axarr = plt.subplots(1,2)  #一行两列
axarr[0].set_title('x')
axarr[0].imshow(x[0,:,:,0])
axarr[1].set_title('x_paded')
axarr[1].imshow(x_paded[0,:,:,0])
Single step of convolution
def conv_single_step(a_slice_prev,W,b):
    """
    在前一层的激活输出的一个片段上应用一个由参数W定义的过滤器。
    这里切片大小和过滤器大小相同

    参数:
        a_slice_prev - 输入数据的一个片段,维度为(过滤器大小,过滤器大小,上一通道数)
        W - 权重参数,包含在了一个矩阵中,维度为(过滤器大小,过滤器大小,上一通道数)
        b - 偏置参数,包含在了一个矩阵中,维度为(1,1,1)

    返回:
        Z - 在输入数据的片X上卷积滑动窗口(w,b)的结果。
    """

    s = np.multiply(a_slice_prev,W) + b

    Z = np.sum(s)

    return Z
Convolutional Neural Networks - Forward pass

def conv_forward(A_prev, W, b, hparameters):
    """
    实现卷积函数的前向传播

    参数:
        A_prev - 上一层的激活输出矩阵,维度为(m, n_H_prev, n_W_prev, n_C_prev),(样本数量,上一层图像的高度,上一层图像的宽度,上一层过滤器数量)
        W - 权重矩阵,维度为(f, f, n_C_prev, n_C),(过滤器大小,过滤器大小,上一层的过滤器数量,这一层的过滤器数量)
        b - 偏置矩阵,维度为(1, 1, 1, n_C),(1,1,1,这一层的过滤器数量)
        hparameters - 包含了"stride"与 "pad"的超参数字典。

    返回:
        Z - 卷积输出,维度为(m, n_H, n_W, n_C),(样本数,图像的高度,图像的宽度,过滤器数量)
        cache - 缓存了一些反向传播函数conv_backward()需要的一些数据
    """

    #获取来自上一层数据的基本信息
    (m , n_H_prev , n_W_prev , n_C_prev) = A_prev.shape

    #获取权重矩阵的基本信息
    ( f , f ,n_C_prev , n_C ) = W.shape

    #获取超参数hparameters的值
    stride = hparameters["stride"]
    pad = hparameters["pad"]

    #计算卷积后的图像的宽度高度,参考上面的公式,使用int()来进行板除
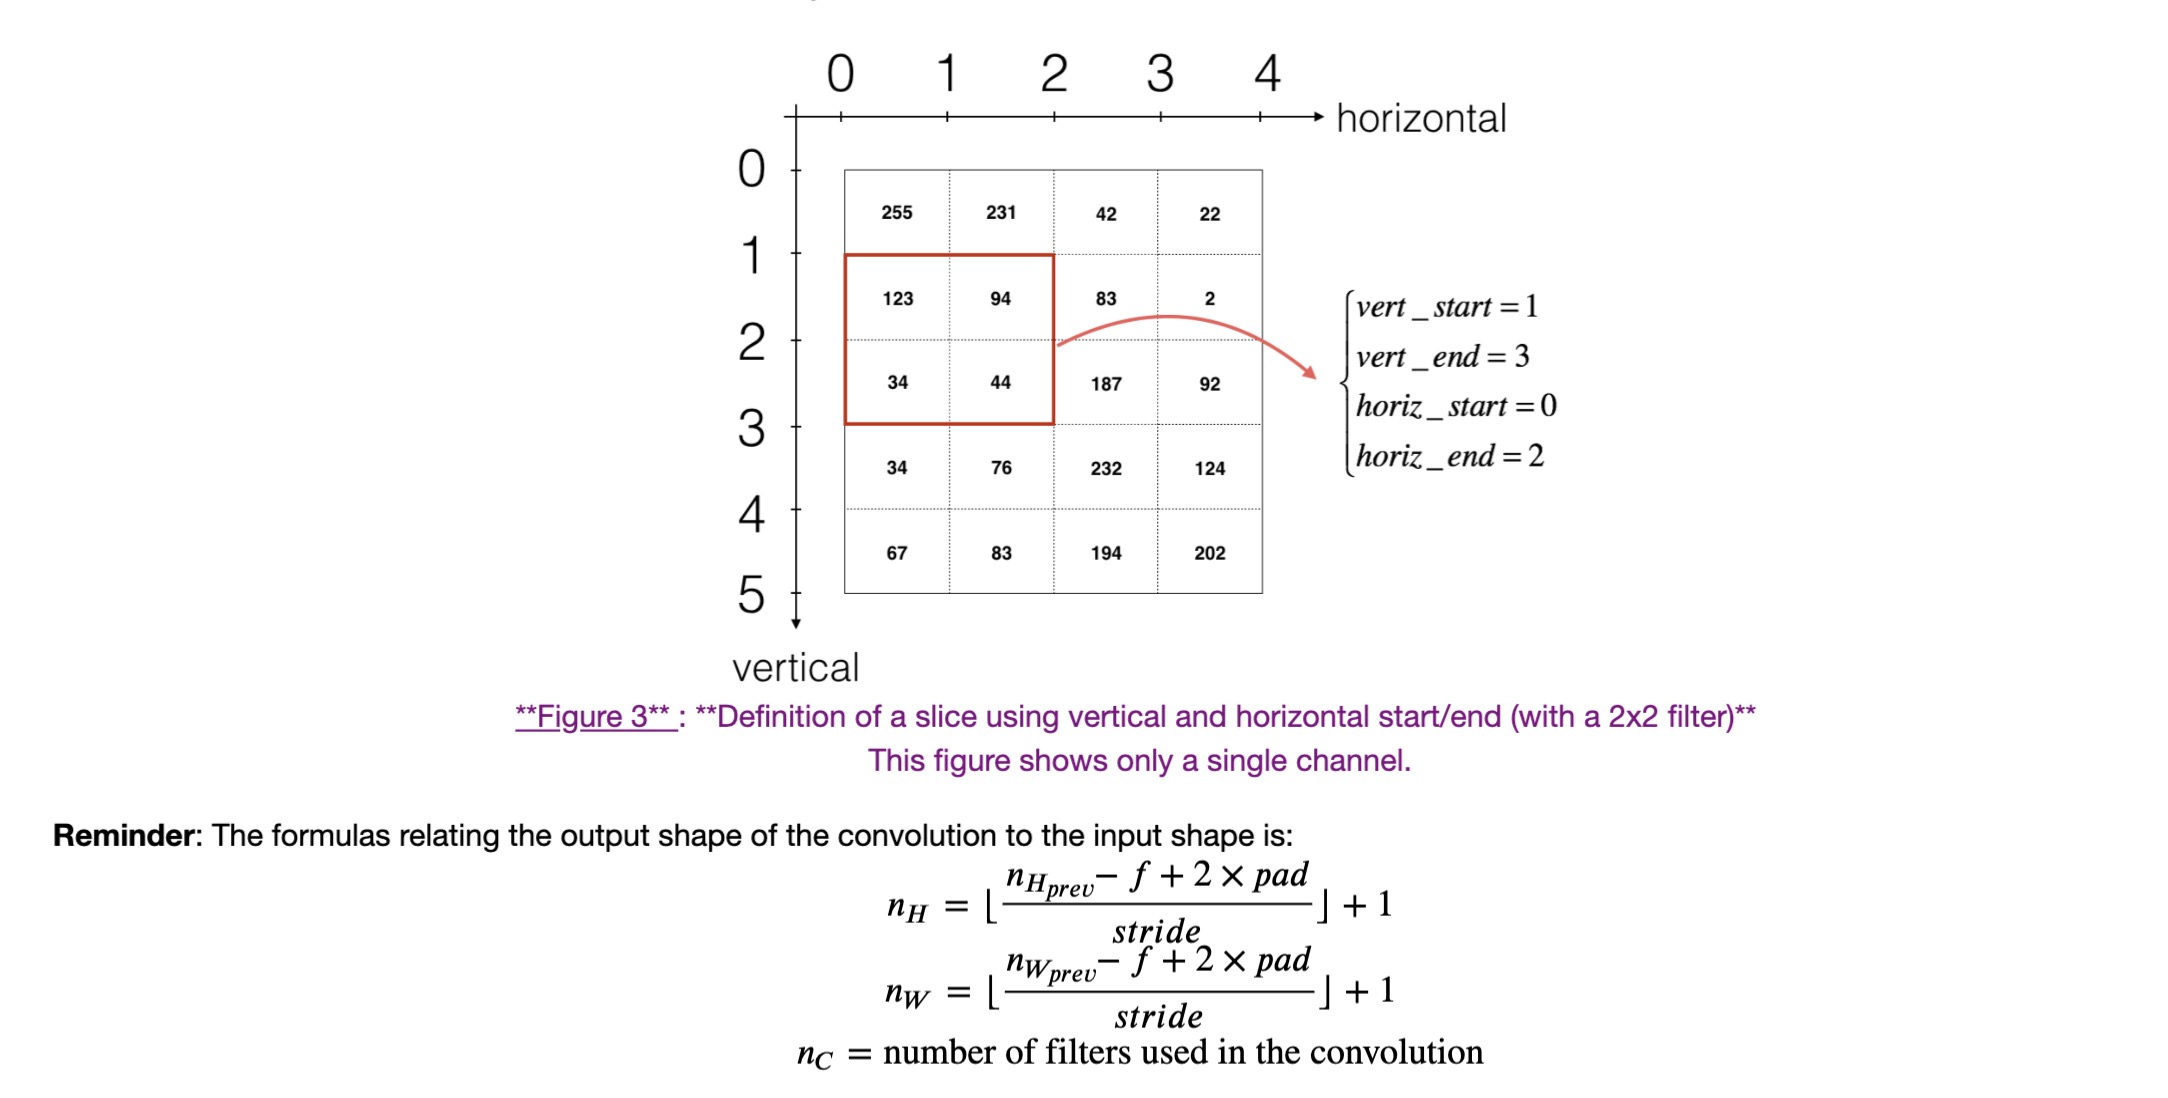
    n_H = int(( n_H_prev - f + 2 * pad )/ stride) + 1
    n_W = int(( n_W_prev - f + 2 * pad )/ stride) + 1

    #使用0来初始化卷积输出Z
    Z = np.zeros((m,n_H,n_W,n_C))

    #通过A_prev创建填充过了的A_prev_pad
    A_prev_pad = zero_pad(A_prev,pad)

    for i in range(m):                              #遍历样本
        a_prev_pad = A_prev_pad[i]                  #选择第i个样本的扩充后的激活矩阵
        for h in range(n_H):                        #在输出的垂直轴上循环
            for w in range(n_W):                    #在输出的水平轴上循环
                for c in range(n_C):                #循环遍历输出的通道
                    #定位当前的切片位置
                    vert_start = h * stride         #竖向,开始的位置
                    vert_end = vert_start + f       #竖向,结束的位置
                    horiz_start = w * stride        #横向,开始的位置
                    horiz_end = horiz_start + f     #横向,结束的位置
                    #切片位置定位好了我们就把它取出来,需要注意的是我们是“穿透”取出来的,
                    #自行脑补一下吸管插入一层层的橡皮泥就明白了
                    a_slice_prev = a_prev_pad[vert_start:vert_end,horiz_start:horiz_end,:]
                    #执行单步卷积
                    Z[i,h,w,c] = conv_single_step(a_slice_prev,W[: ,: ,: ,c],b[0,0,0,c])

    #数据处理完毕,验证数据格式是否正确
    assert(Z.shape == (m , n_H , n_W , n_C ))

    #存储一些缓存值,以便于反向传播使用
    cache = (A_prev,W,b,hparameters)

    return (Z , cache)

np.random.seed(1)
A_prev = np.random.randn(10,4,4,3)
W = np.random.randn(2,2,3,8)
b = np.random.randn(1,1,1,8)
hparameters = {"pad" : 1,
               "stride": 1}

Z, cache_conv = conv_forward(A_prev, W, b, hparameters)
print(Z.shape)
print("Z's mean =", np.mean(Z))
print("cache_conv[0][1][2][3] =", cache_conv[0][1][2][3])

#(10, 5, 5, 8)
#Z's mean = 0.1452029784642301
#cache_conv[0][1][2][3] = [-0.20075807  0.18656139  0.41005165]
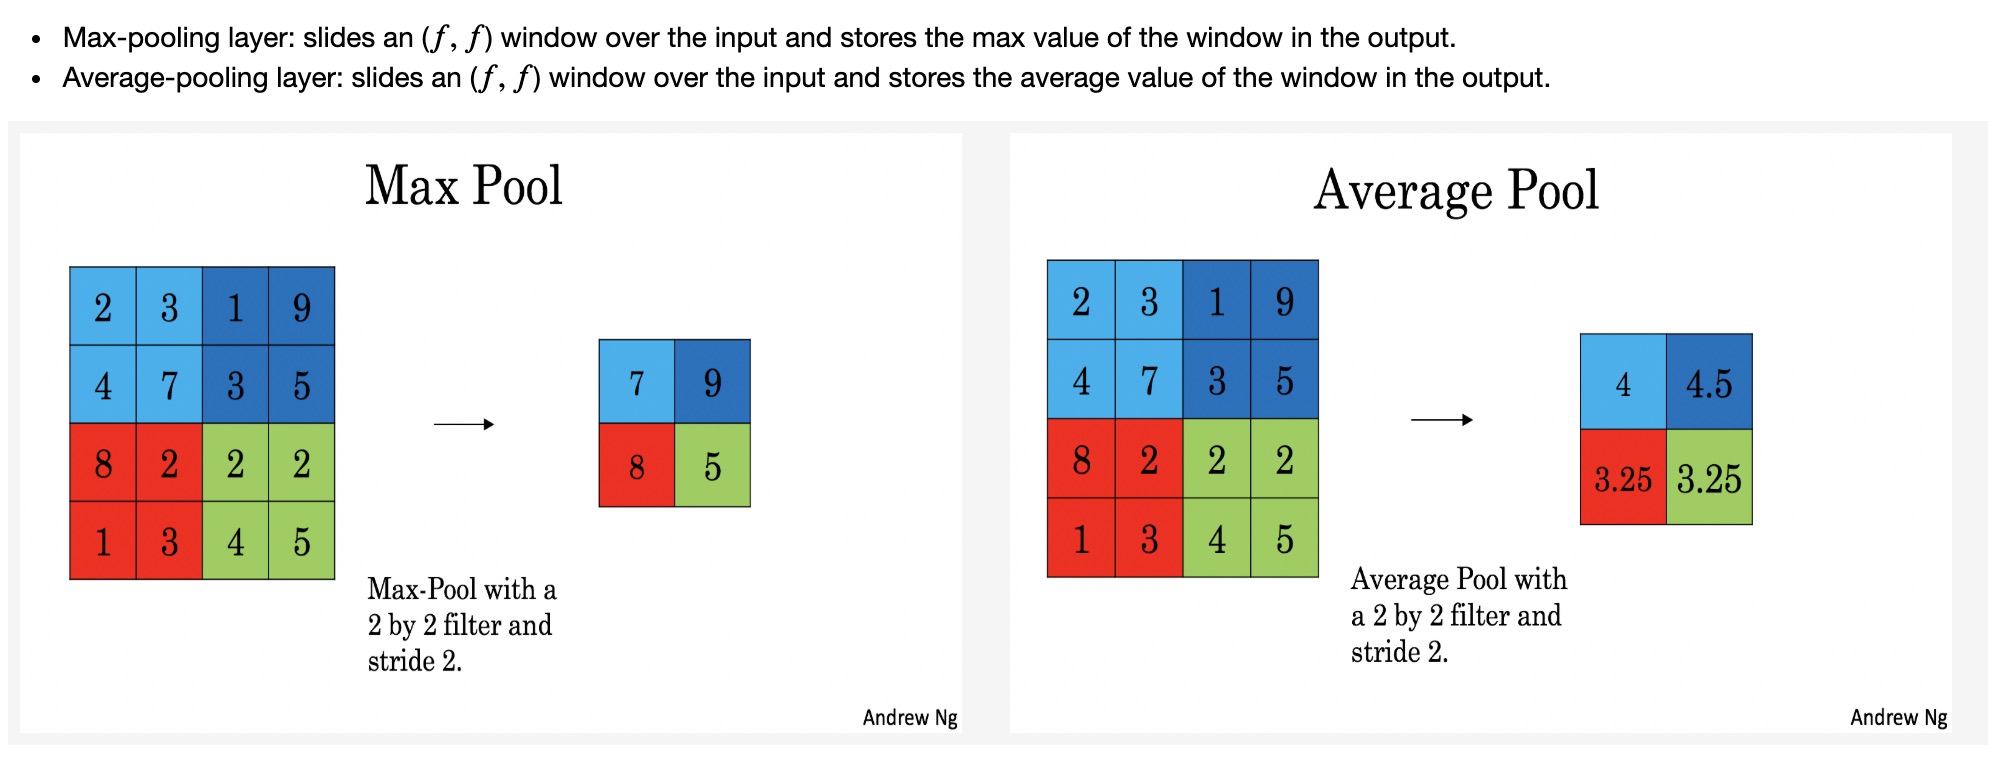
Pooling layer

As there’s no padding, the formulas binding the output shape of the pooling to the input shape is:
\[n_H = \lfloor \frac{n_{H_{prev}} - f}{stride} \rfloor +1\] \[n_W = \lfloor \frac{n_{W_{prev}} - f}{stride} \rfloor +1\] \[n_C = n_{C_{prev}}\]def pool_forward(A_prev,hparameters,mode="max"):
"""
实现池化层的前向传播
参数:
A_prev - 输入数据,维度为(m, n_H_prev, n_W_prev, n_C_prev)
hparameters - 包含了 "f" 和 "stride"的超参数字典
mode - 模式选择【"max" | "average"】
返回:
A - 池化层的输出,维度为 (m, n_H, n_W, n_C)
cache - 存储了一些反向传播需要用到的值,包含了输入和超参数的字典。
"""
#获取输入数据的基本信息
(m , n_H_prev , n_W_prev , n_C_prev) = A_prev.shape
#获取超参数的信息
f = hparameters["f"]
stride = hparameters["stride"]
#计算输出维度
n_H = int((n_H_prev - f) / stride ) + 1
n_W = int((n_W_prev - f) / stride ) + 1
n_C = n_C_prev
#初始化输出矩阵
A = np.zeros((m , n_H , n_W , n_C))
for i in range(m): #遍历样本
for h in range(n_H): #在输出的垂直轴上循环
for w in range(n_W): #在输出的水平轴上循环
for c in range(n_C): #循环遍历输出的通道
#定位当前的切片位置
vert_start = h * stride #竖向,开始的位置
vert_end = vert_start + f #竖向,结束的位置
horiz_start = w * stride #横向,开始的位置
horiz_end = horiz_start + f #横向,结束的位置
#定位完毕,开始切割
a_slice_prev = A_prev[i,vert_start:vert_end,horiz_start:horiz_end,c]
#对切片进行池化操作
if mode == "max":
A[ i , h , w , c ] = np.max(a_slice_prev)
elif mode == "average":
A[ i , h , w , c ] = np.mean(a_slice_prev)
#池化完毕,校验数据格式
assert(A.shape == (m , n_H , n_W , n_C))
#校验完毕,开始存储用于反向传播的值
cache = (A_prev,hparameters)
return A,cache
np.random.seed(1)
A_prev = np.random.randn(2,4,4,3)
hparameters = {"f":4 , "stride":1}
A , cache = pool_forward(A_prev,hparameters,mode="max")
A, cache = pool_forward(A_prev, hparameters)
print("mode = max")
print("A =", A)
print("----------------------------")
A, cache = pool_forward(A_prev, hparameters, mode = "average")
print("mode = average")
print("A =", A)